
How to Choose an iPhone Case That Actually Protects Your Camera Lens
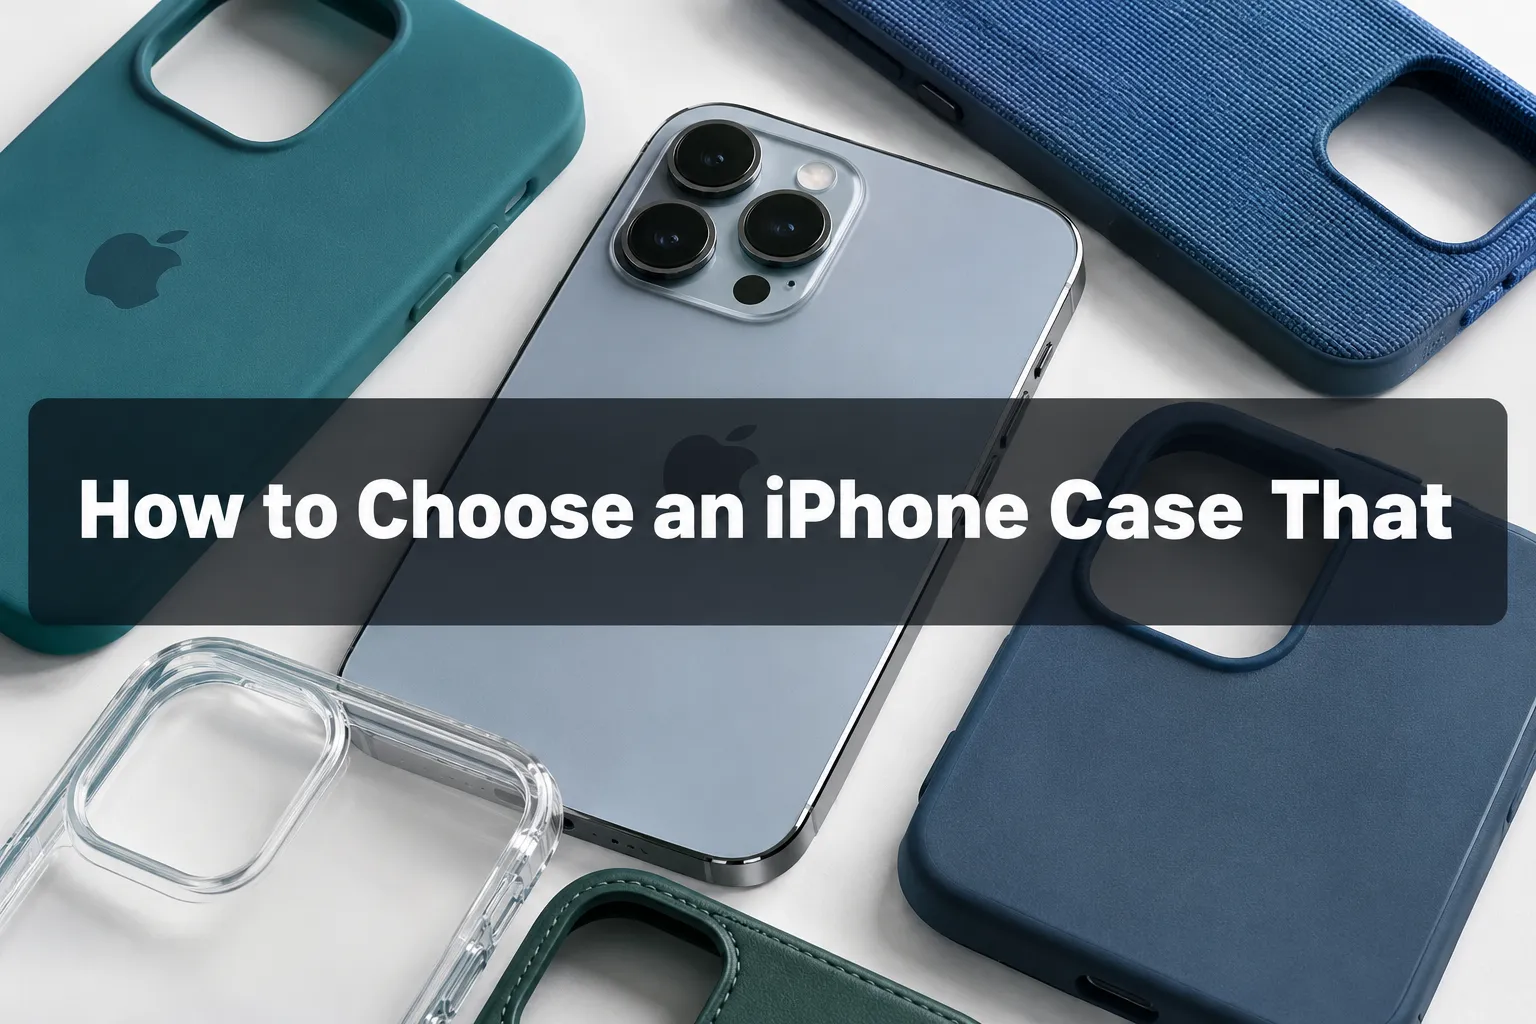
A cracked iPhone camera lens can cost anywhere from $150 to over $400 to repair at an Apple Store, yet the vast majority of those breaks happen because the case someone bought offered zero meaningful protection for the lens module. Knowing how to choose an iPhone case that actually protects your camera lens is not just a matter of aesthetics or brand loyalty; it is a decision that directly affects one of the most expensive and fragile components on your phone.
This guide breaks down every factor that matters, from the physics of raised lips and tempered glass to MagSafe compatibility, model-specific fit, and proper installation technique. Whether you own an iPhone 15, 16, or are planning ahead for the iPhone 17 family, the framework here will help you make a smarter, more confident buying decision.
Key Takeaways
- A raised camera lip is the minimum baseline, it keeps the lens off flat surfaces during drops and rests.
- Combining a rugged case with a dedicated tempered glass lens protector offers the strongest real-world defense.
- Glass hardness (9H), coating quality, and case clearance are the three technical specs that separate effective lens protectors from useless ones.
- MagSafe compatibility and model-specific fit are non-negotiable for iPhone 15, 16, and 17 users.
- Proper installation technique matters as much as product quality, a poorly applied protector can degrade image quality and pop off during a drop.
Why the Camera Lens Is the Most Vulnerable Part of Your iPhone
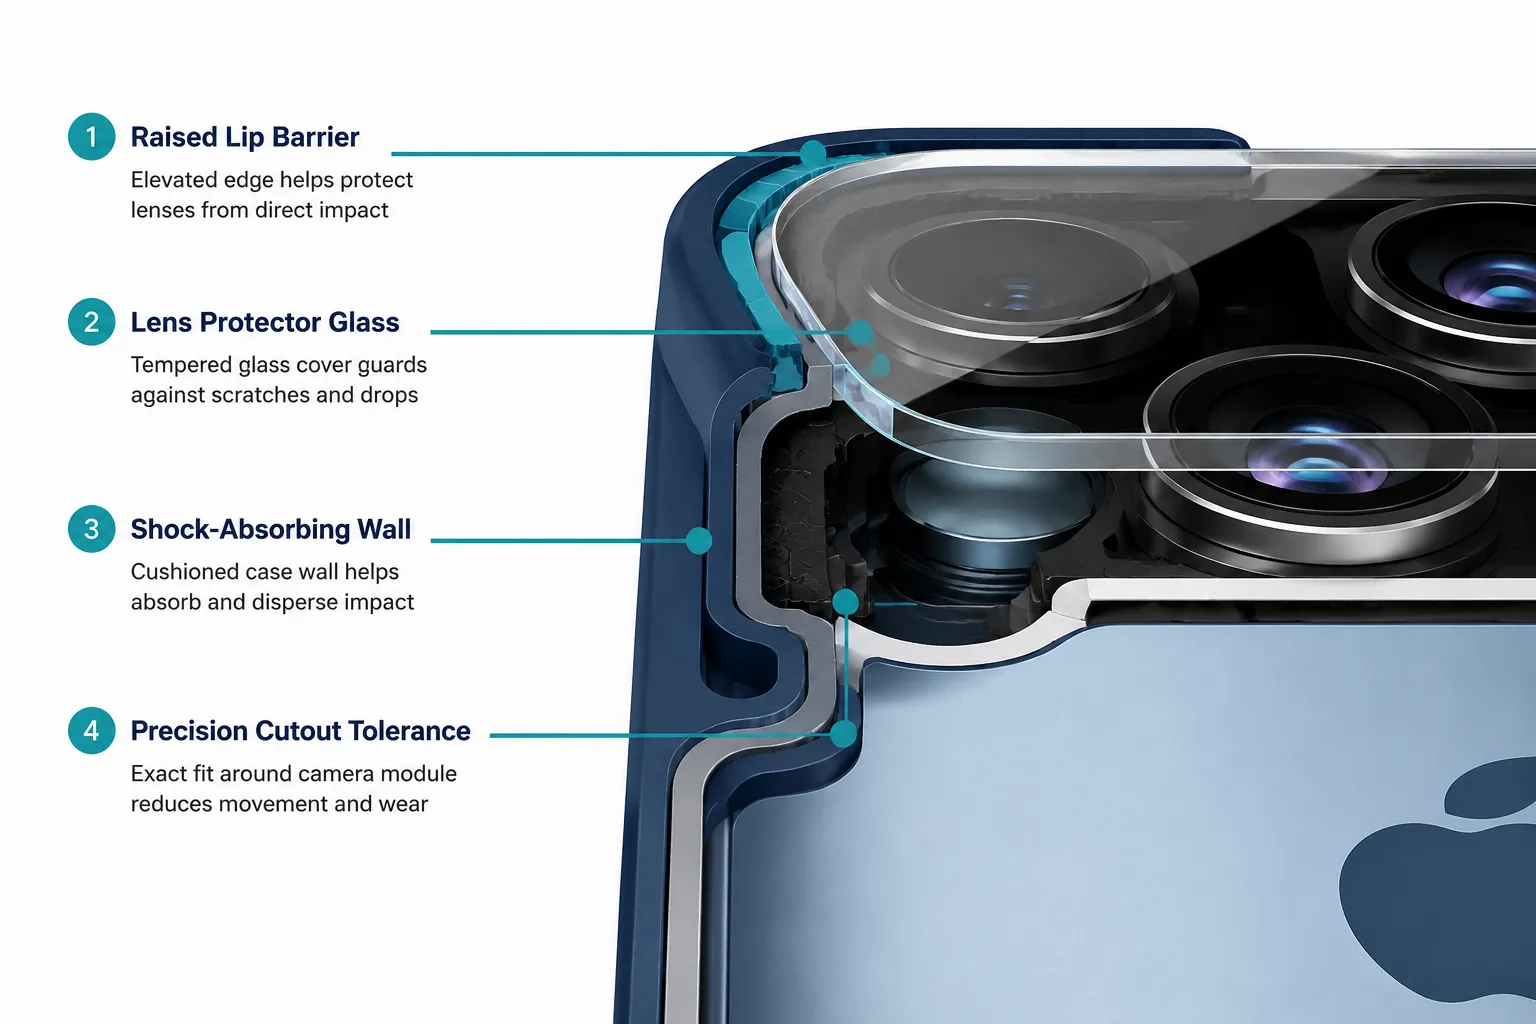
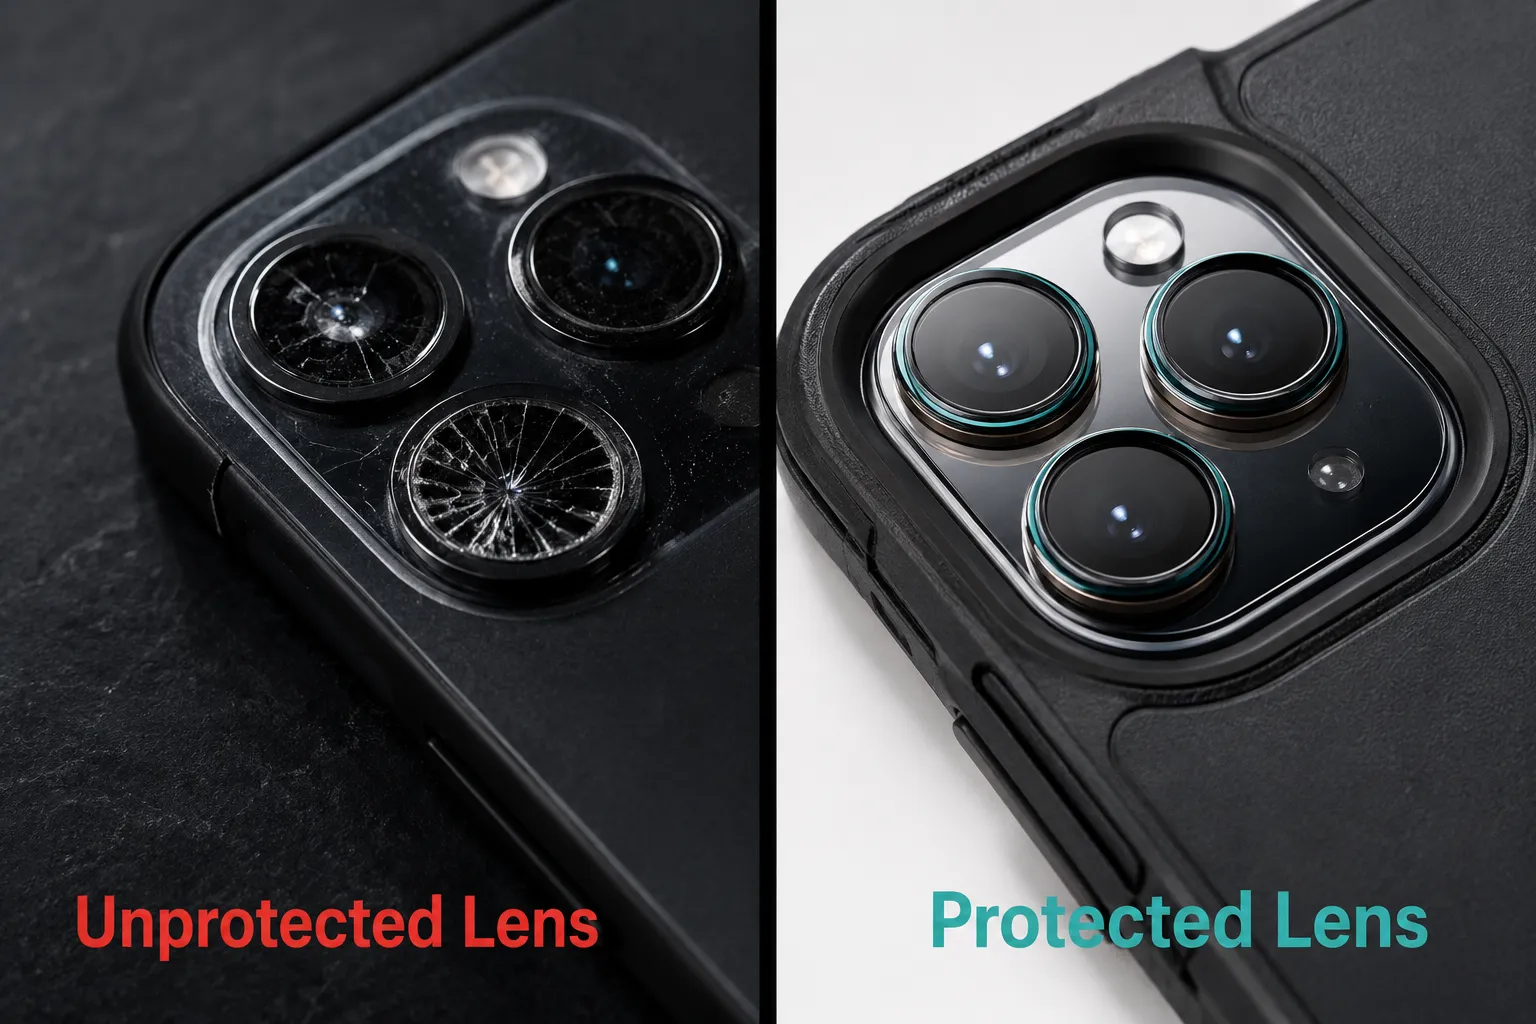
The camera module on modern iPhones protrudes significantly from the back of the device. On the iPhone 16 Pro Max, for example, the camera island sits several millimeters above the rear glass. Every time the phone is placed face-up on a table, slid into a bag, or dropped, that protruding lens system makes first contact with the surface.
The lens cover itself is made from a proprietary sapphire crystal composite on higher-end models, but sapphire is hard, not tough. It resists fine scratches well but can still crack under sharp point impacts or when placed under sustained pressure at an angle. Standard glass lens covers on mid-range iPhones are even more susceptible.
The three most common damage scenarios are:
- Placing the phone face-up on a gritty or textured surface (keys, sand, concrete)
- Dropping the phone at an angle that causes the camera island to absorb the impact
- Sliding the phone across a surface while it sits inside a poorly fitted case
Understanding these failure modes is the foundation for knowing how to choose an iPhone case that actually protects your camera lens, because each scenario requires a different layer of protection.
“The lens cover is the single most expensive consumable on a modern iPhone. A $15 protector is the cheapest insurance policy in consumer electronics.”, Editorial consensus across multiple accessory review outlets [3]
The Four Main Case Protection Strategies
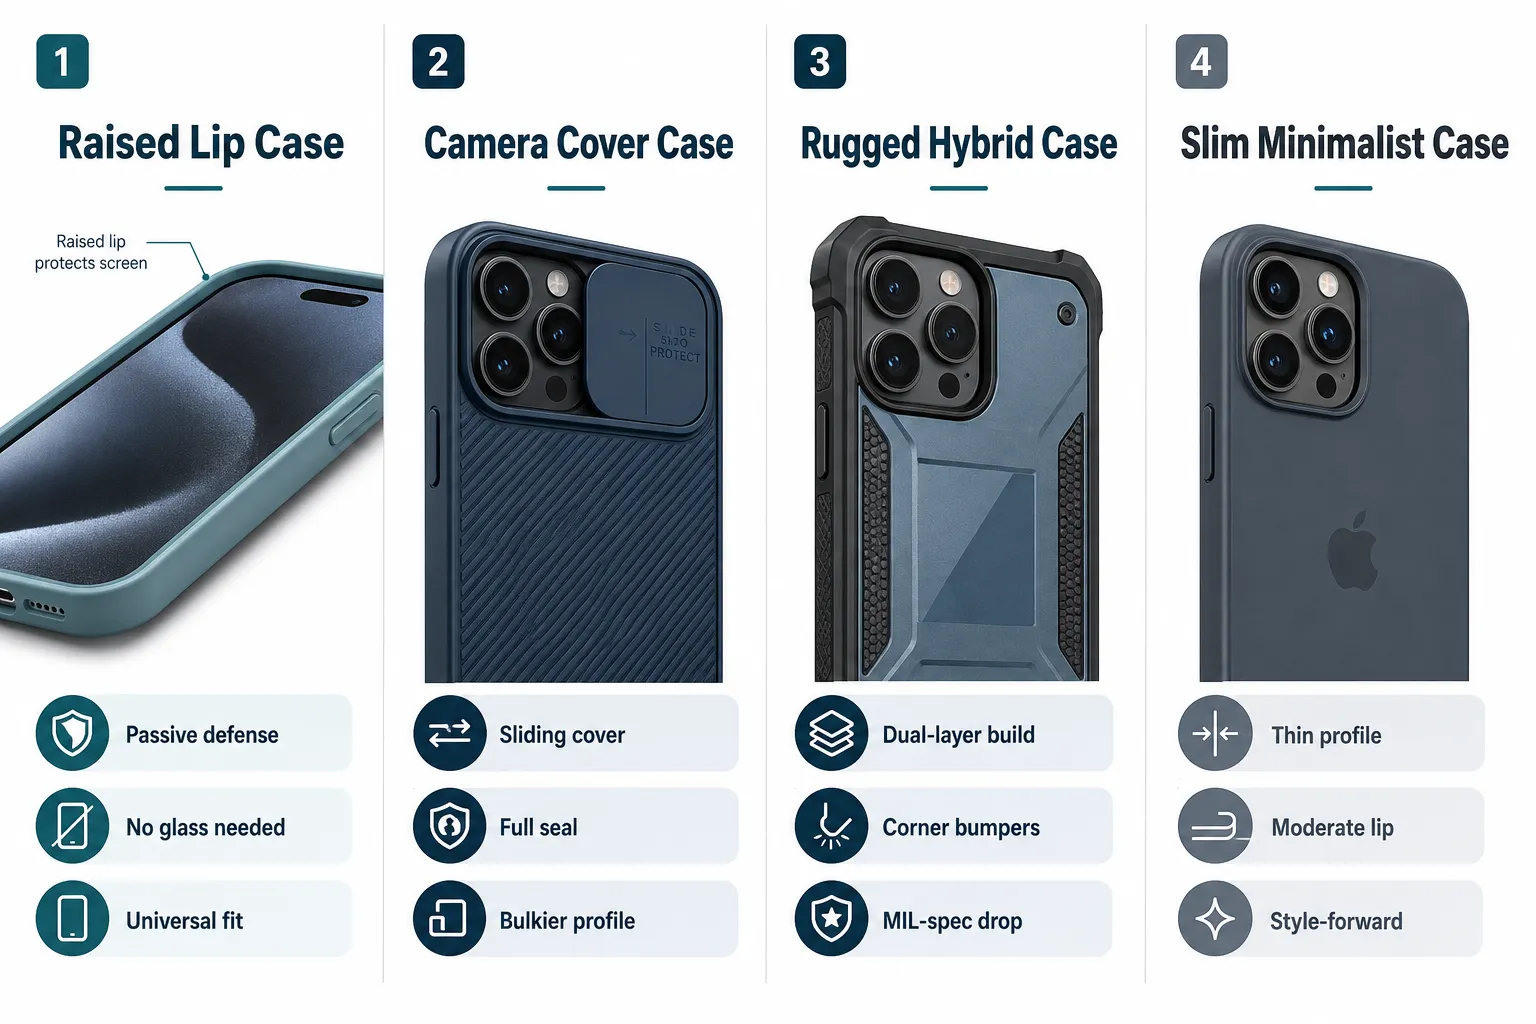
Not all cases protect the camera in the same way. There are four distinct strategies on the market in 2026, each with different trade-offs between protection level, bulk, and daily usability [7].
Strategy 1: Raised Camera Lip Cases
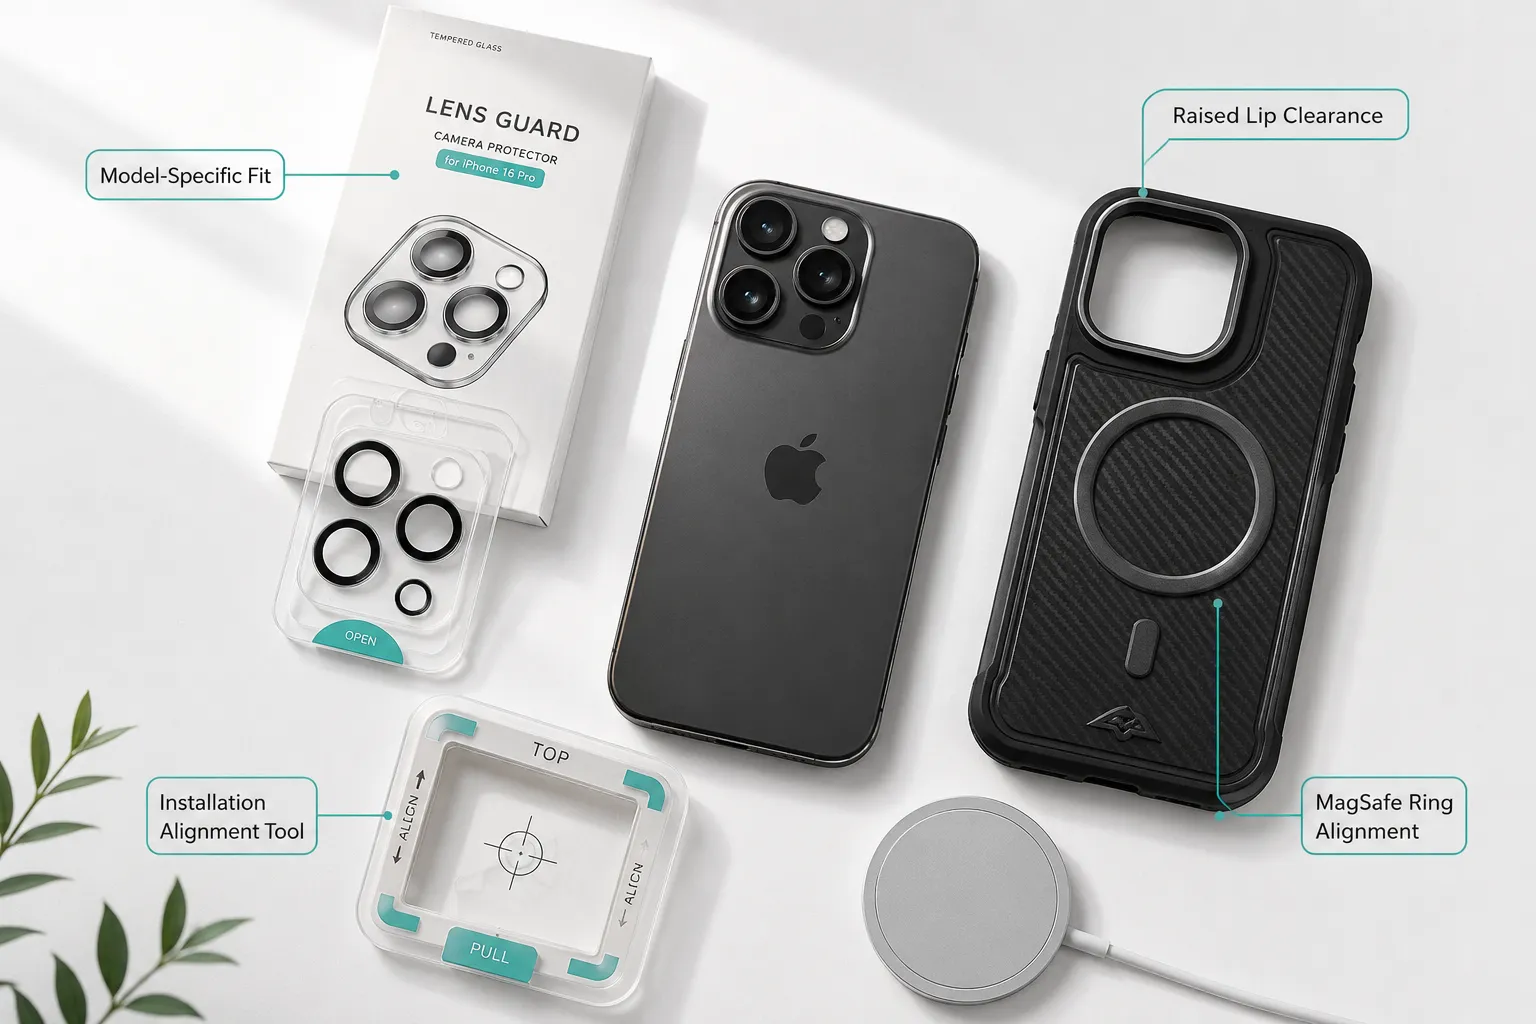
A raised lip, sometimes called a camera bumper or camera guard, is a ridge of case material that surrounds the camera module and sits slightly higher than the lens surface. When the phone is placed flat on a table, the lip contacts the surface first, keeping the lens suspended above it.
This is the minimum acceptable standard. A case without any raised lip offers essentially no protection for the lens. The lip height matters: a 0.5mm rise provides minimal protection, while a 1.5mm to 2mm rise is considered robust by most accessory reviewers [2].
Raised lip cases are the most common type on the market and are available at every price point. Their limitation is that they do not protect against direct impacts to the lens itself, a sharp corner drop directly onto the camera module can still crack the glass.
Strategy 2: Full-Coverage Camera Cover Cases
A growing segment of the market now offers cases with a physical sliding or flip cover that completely seals the camera module when not in use [7]. These provide the highest passive protection because the lens is never exposed unless you deliberately open the cover to take a photo.
The trade-off is convenience. Opening the cover before every shot adds a step, and some covers can interfere with the camera app’s launch speed. These cases also tend to be bulkier. For users who prioritize protection above all else, tradespeople, outdoor adventurers, parents with young children, this strategy is worth the inconvenience.
Strategy 3: Rugged Hybrid Cases with Built-In Lens Protection
Rugged cases from brands like OtterBox, Spigen, and Rokform combine drop protection with reinforced camera cutouts that include their own raised structures or even built-in lens covers [5]. These cases are designed to meet MIL-STD-810G drop test standards and provide comprehensive protection across the entire device.
The camera cutout on a quality rugged case is engineered with tight tolerances so that the case material itself acts as a bumper around the lens module. Some models include a small tempered glass insert over the camera as part of the case design.
Strategy 4: Slim Cases with Moderate Lip
Slim cases prioritize aesthetics and pocket-friendliness. They typically include a modest raised lip but sacrifice the corner reinforcement and material thickness that absorb impact energy. For everyday office use where drops are infrequent, a slim case paired with a dedicated lens protector (covered in the next section) can be a reasonable compromise.
How to Evaluate Lens Protector Specs That Actually Matter
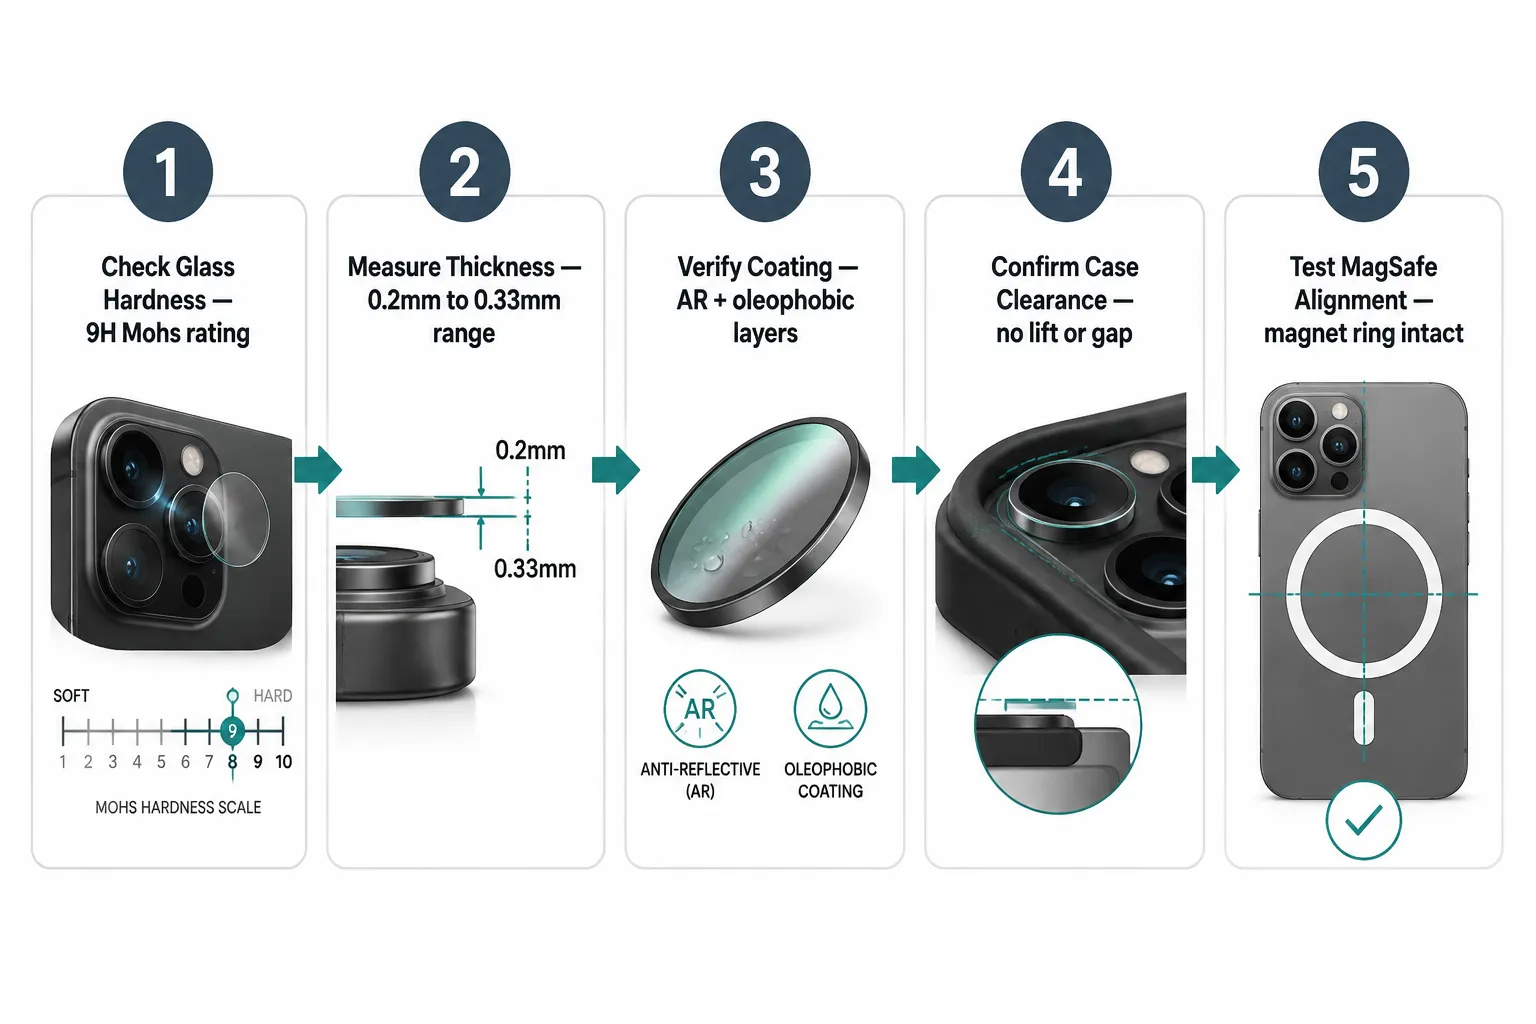
A dedicated camera lens protector is a separate accessory, a small tempered glass plate or ring that adheres directly over the camera module’s lens covers. The expert and editorial consensus in 2026 treats these as essential rather than optional for anyone who wants serious protection [1][3][4].
When evaluating lens protectors, four technical specifications determine whether a product is genuinely protective or just decorative.
Glass Hardness: The 9H Standard
Hardness is measured on the Mohs scale. Standard window glass rates around 5.5H. A quality lens protector should be rated at 9H, which means it resists scratching from most everyday materials including keys, coins, and sand particles [9]. Products rated below 9H will develop micro-scratches that eventually degrade image quality by scattering light across the lens.
Check the product listing carefully. Some manufacturers list “9H equivalent” or “9H-like hardness,” which is marketing language that does not guarantee the same performance as a verified 9H tempered glass product.
Glass Thickness: The 0.2mm to 0.33mm Sweet Spot
Thicker glass absorbs more impact energy but adds more bulk and can interfere with autofocus performance on close-up shots. The industry sweet spot is between 0.2mm and 0.33mm [8]. Products thicker than 0.4mm may cause a subtle haze on macro photography. Products thinner than 0.15mm provide insufficient impact resistance.
Coatings: AR and Oleophobic Layers
Two coatings matter for lens protectors:
- Anti-reflective (AR) coating: Reduces internal reflections that can cause ghosting or flare in photos, especially in low-light conditions.
- Oleophobic coating: Repels fingerprints and oils from the lens surface, making it easier to keep clean.
A lens protector without an oleophobic coating will accumulate smudges rapidly, which directly degrades photo quality [1]. Always verify that both coatings are present before purchasing.
Case Clearance: The Compatibility Problem Nobody Talks About
This is the most overlooked specification. When a lens protector is applied to the camera module and then placed inside a case, the case’s camera cutout must be large enough to accommodate the added thickness and width of the protector without pressing against its edges.
If the case presses on the protector’s edges, two problems occur: the protector can pop off during a drop, and the pressure can cause micro-cracks in the protector glass itself. Always check whether the lens protector manufacturer lists compatible cases, or whether the case manufacturer explicitly states lens-protector compatibility [5].
MagSafe Compatibility and Model-Specific Fit
The introduction of MagSafe in iPhone 12 and its continued presence through the iPhone 16 and upcoming iPhone 17 families adds a layer of complexity to case selection that did not exist in earlier years.
Why MagSafe Matters for Camera Protection
MagSafe cases include a ring of magnets embedded in the case material, aligned precisely with the magnets inside the iPhone. If a case’s camera cutout is not properly designed around both the MagSafe ring and the camera module, one of two problems emerges: the MagSafe alignment is disrupted (reducing charging efficiency and accessory compatibility), or the camera cutout is compromised to accommodate the magnet ring, leaving the lens less protected [5].
Look for cases that are explicitly labeled “MagSafe compatible” and that include a dedicated camera protection design, not just a generic cutout.
The iPhone 16 and 17 Multi-Lens Module Challenge
The iPhone 16 Pro and Pro Max feature a triple-lens system with a LiDAR scanner and a microphone aperture all housed within a single large camera island. The iPhone 17 family is expected to introduce an even larger camera bar design that spans the full width of the device [10].
This evolution has significant implications for case selection:
- A case designed for the iPhone 15 Pro will not fit the iPhone 16 Pro correctly, even if the overall phone dimensions are similar.
- Lens protectors must be purchased specifically for the correct model, a protector for a three-lens layout will not align correctly on a two-lens layout.
- The larger camera islands on upcoming models will require cases with wider and more structurally complex camera cutouts [10].
Always verify model-specific compatibility before purchasing any case or lens protector. Generic listings that claim compatibility with “iPhone 15/16/17 Pro” without specifying the lens layout are a red flag.
Official Apple Cases and Sapphire Protection
Apple’s own cases are engineered with precise tolerances for each iPhone model and include a raised camera lip designed to Apple’s own specifications. The iPhone 16 Pro’s rear camera system uses a sapphire crystal lens cover that is harder than standard glass, but as noted earlier, hardness does not equal crack resistance under point impact [2].
For users who want the cleanest integration between case and camera system, Apple’s official cases are a defensible choice, but they do not include a built-in lens protector, so adding a dedicated tempered glass protector remains advisable even with an official Apple case.
Proper Installation and Ongoing Maintenance
Choosing the right products is only half the equation. Proper installation technique determines whether a lens protector performs as advertised or fails at the first drop.
Step-by-Step Installation for Lens Protectors
Before applying any lens protector, follow this sequence:
- Clean the lens surface thoroughly. Use the alcohol wipe included in most lens protector kits, followed by the microfiber cloth. Any dust particle trapped under the protector will create a permanent air bubble that scatters light and degrades photos.
- Use the alignment tool if provided. Many quality lens protectors include a small plastic alignment frame that positions the protector precisely over the lens cutout before adhesion. This prevents the slight misalignment that can cause edge lifting [1].
- Apply with light, even pressure from the center outward. Do not press hard from one side, this traps air bubbles.
- Allow the adhesive to cure for 24 hours before placing the phone in a case or subjecting it to heavy use.
- Test case clearance after installation. Slide the phone into the case and check that the case does not press against the edges of the lens protector. If it does, the protector is incompatible with that case.
Maintenance and Replacement Schedule
Even a 9H-rated lens protector is a sacrificial layer, it is designed to absorb damage so the actual camera lens does not. Inspect the protector monthly for:
- Visible cracks or chips, especially around the edges
- Persistent cloudiness that does not clean off
- Edge lifting, which indicates the adhesive is failing
Most lens protectors should be replaced every six to twelve months under normal use, or immediately after any significant drop [3][4]. Replacement protectors are typically inexpensive, with quality options available for under $15 for a two-pack [8][9].
What to Avoid
- Avoid silicone-only cases for lens protection. Silicone conforms to surfaces and provides excellent grip but offers minimal structural protection for the camera cutout area.
- Avoid universal-fit lens protectors. The precision required for a multi-lens module means that universal protectors almost always leave gaps or overlap the wrong areas.
- Avoid applying lens protectors in dusty environments. Even a single dust particle under the protector will cause a permanent hotspot in photos.
Combining Case and Lens Protector: The Expert-Recommended Strategy
The editorial and expert consensus across accessory review publications in 2026 converges on a single recommendation: the most effective approach is a combination of a quality rugged or semi-rugged case with a dedicated tempered glass lens protector [2][3][7].
This two-layer strategy works because each component addresses a different failure mode:
| Threat Type | Raised Lip Case | Rugged Case | Tempered Glass Protector |
|---|---|---|---|
| Surface scratches (keys, sand) | Partial | Partial | Strong |
| Flat-surface contact (table rests) | Strong | Strong | None (needs case) |
| Point impact (corner drop on lens) | Weak | Moderate | Strong (sacrificial) |
| Sustained pressure (bag compression) | Moderate | Strong | Moderate |
| Grit abrasion (sliding on rough surface) | Weak | Moderate | Strong |
The table makes clear that no single product covers every threat. A raised lip handles surface contact; a rugged case handles impact energy distribution; a tempered glass protector handles direct abrasion and point impacts to the lens itself.
Budget allocation guidance: Spend the majority of the budget on the case (the primary structural defense) and supplement with an inexpensive but quality-rated lens protector. There is no need to spend more than $15 to $20 on a lens protector to get 9H hardness, AR coating, and oleophobic coating from reputable brands [8][9].
Conclusion
Knowing how to choose an iPhone case that actually protects your camera lens comes down to understanding that no single product is sufficient on its own. The camera module is the most mechanically vulnerable and financially costly component on a modern iPhone, and it faces a range of distinct threats that require layered protection.
Actionable next steps:
- Audit your current case today. Check whether it has a raised camera lip of at least 1.5mm. If it does not, replace it regardless of other factors.
- Add a 9H tempered glass lens protector with AR and oleophobic coatings if you do not already have one. Verify it is model-specific and case-compatible before purchasing.
- Confirm MagSafe compatibility if you use MagSafe charging or accessories. A case that disrupts the magnet ring is a poor long-term choice.
- Check model-specific fit if you are upgrading to the iPhone 16 or planning for the iPhone 17. The camera island geometry changes with each generation, and old cases will not fit correctly.
- Inspect and replace the lens protector every six to twelve months, or immediately after any significant drop.
The combined cost of a quality rugged case and a tempered glass lens protector is a small fraction of a single lens repair bill. That arithmetic alone makes the combined strategy the only rational choice for anyone who depends on their iPhone camera.
References
[1] Iphone Lens Protector – https://smartish.com/blogs/news/iphone-lens-protector
[2] Best Iphone Cases – https://www.nytimes.com/wirecutter/reviews/best-iphone-cases/
[3] Rokform Camera Lens Protector Tempered Glass Screen Protector Review – https://macsources.com/rokform-camera-lens-protector-tempered-glass-screen-protector-review/
[4] Lens Protectors – https://case-mate.com/collections/lens-protectors
[5] ad-hoc-news.de – https://www.ad-hoc-news.de/boerse/news/ueberblick/magsafe-ready-spigen-ultra-hybrid-iphone-15-pro-case-adds-grip-without/69558268
[7] Best Iphone Case With Camera Cover – https://lenstroop.com/best-iphone-case-with-camera-cover/
[8] B09z1szsm4 – https://www.amazon.com/Protector-Tempered-Friendly-Scratch-Resistant-Installation/dp/B09Z1SZSM4
[9] B0b768xc42 – https://www.amazon.com/Ailun-Protector-Tempered-Hardness-Anti-Scratch/dp/B0B768XC42
[10] Latest Iphone Rumors 5650 2026 06 23 – https://smartfinds.io/latest-iphone-rumors-5650-2026-06-23/